First morning at Kew meant meeting more people than I will remember the names of, so it was good to spend a quiet afternoon weeding out ivy from the lake bank with just one colleague.
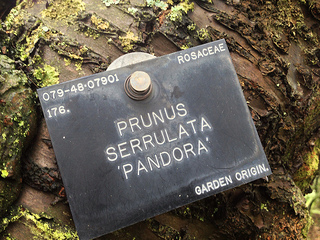
By the way, the ivy we pulled out is Hedera helix (English ivy) of the family Araliaceae…
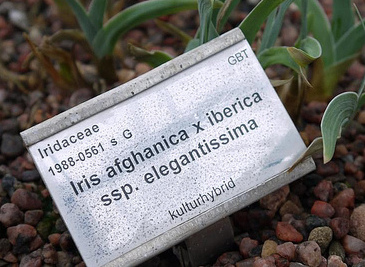
Note: other botanic gardens have very similar labels, have a look at this one I photographed at Göteborgs botaniska trädgård in Sweden
Me & Kew
Here we go…
Well, at the end of February I found out about Kew Gardens Horticultural Internship and applied. I must say, when the news came back that I had been accepted as an intern at the Arboretum, I was quietly excited BUT greatly worried! It was going to be something so very different from when I had done before… but then, this is the real start of my career changing adventure, so it is only right to have butterflies in my stomach.
Another year draws to an end
This has been a busy year.
In the plot, I have grown a few new crops: oca, achocha, shark fin melon, salsify, scorzonera. And the year I tried seaweed meal as a soil conditioner and cardboard mulch in autumn. The year I planted more fruit bushes because I think perennials are much less effort and crop well (with the exception of strawberries, slugs’ favourite meal over the summer).
I have achieved my RHS Certificate in Horticulture and moved on to study horticulture at a higher level.
I have also been on the plot rather little, considered how much time I had available – one excuse was the rather dreadful summer, with rain nearly every day for all of July and August. But I have cooked a lot more, with more ingredients and learnt how to bake sourdough, make yogurth and my own curries (I started with this book, which I really recommend).
This was the year I decided that I am going to shift my career to work in sustainable agriculture and food production (it might take a while, but I will do it, because that is what I am ultimately interested in).
All of the above activities and interests have brought me together with some very interesting new people, four of whom have influenced me in particular (in alphabetical order):
- Carl Legge, who someone called a “Renaissance man”, about whom I have talked before and half whose library contains books that are in mine too. Except Carl also reads them, and develops a wealth of knowledge about permaculture, food and human behaviour. In his Welsh paradise, shared with sweetest and sharp wife Debs and loveliest son, Carl is almost self sufficient, thanks to his extraordinary creativity. Generous with his time, knowledge and produce, Carl also set up the Seedy Penpals seed exchange scheme.
- Joanna of blog Zeb Bakes, is a great baker, inquisitive cook, kitchen tools’ geek, owner of a lovely poodle, gardener, and a lot more. To me, she’s been a generous, helpful, supportive and understanding friend.
- Pietro Parisi, “the farmers’ chef“ as he likes to think of himself (or a chef de terroir as a French would say), is a Neapolitan born, internationally travelled chef who loves his native region and the local farmers that still produce traditional fares in the traditional way, but risk being swept away by the modern food system. Pietro, through his restaurant and as many initiatives as he manages to take part in, is keen to share his knowledge of traditional cooking and preserving techniques with everyone, to inspire a more sustainable way of eating and producing. A Slow Food prize winner, Pietro has recently cooked for ex French president Sarkozy and writer Daniel Pennac.
- Sonia Piscicelli, the author of the Italian blog Il Pasto Nudo and of recently published book Cooking, responsibly (which I had the pleasure of translating into English, for a Feb 2013 release). Sonia loves her food, which, she believes, is not just what we stuff our mouth and fill our bellies with, but the means to keep us healthy and active: that is why she chooses locally grown, fresh, organic or biodynamic, and home cooked.
Merry Christmas – if you celebrate –
and to a happy New Year of gardening and cooking!
Food price, at what cost?
wondering about increasing food prices, why people eat crappy food thinking it’s ok for them, and figuring out how much it cost me to have an organic meal last night (with recipe)
The British, as portrayed in the media, are facing food poverty, or “nutrition recession” as the Guardian put it.
Now, this is the kind of information that turns my stomach.
And I tell you as someone that is currently out of a job: even if I cannot define myself other than rather well off, as a foreigner in this country during a period of economic stagnation I have to worry about my future budget availability. Am I going to skimp on food?
Definitely not, and certainly not as my first move.
There are quite a lot of things that are not essential in our lives: plenty of clothes, the latest technology gadgets, driving a car all the time – and those are just some.
But food is essential. It is the fuel that makes our bodies work. And what you put in, you get out. Adding the trouble of poor health to financial problems is doing nobody any good. Besides, food is an inexpensive pleasure that we can enjoy with our family and friends. It gives colour and flavour to life.
Is the price of food the first thing we need to address for better nutrition? Maybe not.
We do not spend that much of our budgets on food, anyway. In 2009, the average UK household spent 11.5% of their budget on food and drink, the lowest income households spending a bit more at 16% [1]. Back in the 60s, it was +20% [2]. So food is considerably more affordable now than it has ever been. And we are among the luckiest: in developing countries food costs way more, with Kenyan households spending some 45% of their budgets [3]. With all that extra availability, it is disgraceful that we do end up eating nutrition-poor diets here.
Even if rising, food prices are still comparatively low. So, why do people turn straight to cheap, processed food, that is nutritionally poor albeit “filling”, and makes them sick and the environment worse off ? I find that a bit baffling myself, but I suspect there are many factors involved, as well as a healthy dose of laziness.
1. expectations and perceptions on the price of food
It appears a lot of people consider good, healthy food a preserve of the rich. And organic as the brand name for frivolously expensive food, not – as it actually is – the normal way to produce food, proven by millennia of human history. In fact, what we call “conventional” agriculture has been around only for less than a century, a lot of it spurred by a need to find a use for the thriving post-war chemical industry.
Besides, a 60 odd year-long ad campaign has drilled into our heads that food has to be cheap, we have a right to cheap food. It does not matter what the real costs are: how much it actually costs to produce food in the fields, whether our farmers are paid decent wages, if there are any drawbacks to current production and processing methods – on the environment we live in and on our health.
2. misinformation and lack of awareness
How many people really know what’s behind the glossy appearance of the food supply chain? Who has the time and means to find out? Without mentioning that calling for cheap food wins votes – pointing out the real cost of food not that many.
Besides, many do not seem aware of the nutritional value of different foods, and, in any case, they would not know how to cook them.
Despite the proliferation of celebrity chefs – on TV, on the web and in the bookstores – everyday cooking from scratch is far from being part of the everyday life of most people.
We throw away enormous amount of food – often we buy too much without realising (allured by misleading promotions of all kinds [4], sometimes we do not know if something is still good to eat, most of the time – it’s so cheap – we do not realise the effort needed to produce food [5].
3. culture and social pressures
And the culture around food in general does not seem to help. I was beyond shocked by an article last year: “toast sandwich is UK cheapest meal“. Its playfulness I found appalling. The nutritional value of industrial bread with butter and seasoning must be close to zero. The fact that is filling is not really relevant. And that they called a contest to find an even cheaper meal isn’t just sending the plain wrong signals? Well, it was after all the Royal Society of Che-mi-stry (rather than say a farmer or cook) to push this genius idea…
If it is more socially acceptable, aka “cooler”, to eat lukewarm soggy stuff in a bag from a fast food chain, than spending a little bit of time turning vegetables into appetizing meals, well, then I do not see many people choosing to spend time figuring out what to do with vegetables.
With the fact that being overweight does not seem as big a taboo here as it is in Italy (you know it was very difficult to find clothes above size 16 when I was there? that worked to keep me on a diet!), there is not that much pressure to keep fit and knowing your food as part of it.
—————–
Grilled mackerel with beetroot salad
Now, last night I had a rather special fish meal, which was also very quick to prepare, healthy, filling and so tasty. All of the ingredients were sustainable and organic, a mixture of my own, Riverford’s (cheaper, more quality but less variety) and Abel and Cole’s (more expensive but more variety). Except coffee, which came from Sainsbury’s. Did it cost me much? Let’s try to figure out.
Cornish mackerel fillets 350 gr £3.39
extra virgin olive oil 4 tbsp/80 ml £0.55 (I buy mine from Riverford in a 2 l tin)
1 red chilli £0.55
1 knob ginger 10 gr £0.13
1 garlic clove 10 gr £0.15 actually, I grew my own
potatoes 300 gr £0.35 actually, I grew my own
beetroot 300 gr £0.58
2 celery sticks £0.44
1 tsp mustard 10 gr £0.20
1 tsp sea salt 10 gr £0.01 (price from Neifislife)
———-
£6.44
plus we had a UK apple each £0.85
and a fairtrade espresso each 20 gr £0.32
———–
£7.61
we drank tap water (price negligible).
Time to prepare 30-40 min.
Prepare the chilli, ginger and garlic infusion by chopping finely and adding to 2 tbsp oil. Set aside.
Boil the potatoes and beetroot – my auntie says: “under the ground cold water, above ground hot water” so I placed the veggies in the pan with cold water and brought to the boil, then added salt and simmered on for 10 mins or so until tender.
Peel the veggies and cut into chunks. Add the celery, chopped. Mix the mustard into the remaining 2 tbsp of oil, and season the warm salad with it. I did not use any salt but you could.
Wash briefly the fillets under a tap, score the skin, pour the infusion over them, place on a tray skin up, and pass under the grill until the skin is crispy, some 5 mins in all.
Serve.
————–
Now, this was a treat of a meal, yet very quick and easy to prepare, and came to just under £8 GBP for the two of us. Plus the fuel for the cooking, but not much of it.
Not many takeways that cost less, right? Even a Papa John’s pizza meal offer costs £5/head – and you do not know what you are REALLY eating!
Instead, our meal was very nutritious with proteins from the fish, carbs in the potatoes, fibers and vitamins in the apples, beetroot, celery, ginger, garlic and chilli, sugars in the apple and some healthy fat from the oil. Then there was the coffee, not very healthy and not the most environmentally friendly of things. But at least it was fairtrade as well as organic, so the farmers got a fair pay for their work.
And we have a clear conscience. To make our veggies and fruit no pesticide were sprayed to kill bees and ladybirds and make the farmers sick, the fish was caught by day boats, not trawlers damaging the sea bed. The apples were not shipped from the other side of the world, burning oil and polluting. As most of the produce was from the UK, we supported British fishermen and farmers. Supermarket chains only provided the coffee, nothing else.
What do you think? Is price of food the real problem?
[1] source DEFRA Food Pocketbook 2011
[2] source DEFRA Food Security 2006
[3] source Mother Jones
[4] BBC Rip Off Food series was interesting in this respect, if you get a chance watch it
[5] more info on food waste and how to avoid it
The how and whys of making yogurt
I should be writing about crop rotation, so why I’m posting on making yogurt instead?
It is a truth universally acknowledged that growing your own affects the way you cook and eat. In my case, it has affected the way I think more broadly, for example about reuse and recycle.
On the plot I reuse a lot of punnets, bags and all sort of food packaging, including yogurt tubs, with which I make seedlings domes. I started using them because – mostly coming in plastic 5 – they were not recyclable in our council scheme, which does only 1 and 2 (plastic bottles, basically). When I reached capacity on the plot, I got very annoyed to have to throw them in the bin.
Then I found that Rachel’s used recyclable pots. Then Rachel’s stopped using recyclable pots, and in any case I was so disappointed they used starch in the flavoured yogurt. Then I found that Woodland’s makes lovely sheep yogurt in recyclable pots. But what if they stopped? I have had enough of unreliable supply of my favourite products – it happens a lot here in the UK: as soon as I find something I like, it disappears from the market.
I thought I would like to make my own, so I asked around and ever resourceful Carl said it would be easy peasy and shared his recipe, with which I had a few mixed results trials. Then I also had a chat with Sonia (another great source of food-related advice), and, in just over a month, I managed to come up with a recipe that worked for me, and I’m not going back to tubs!
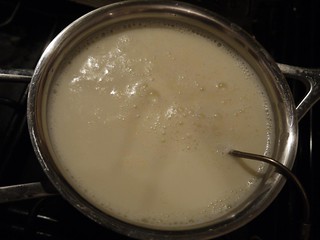
 Trial and error is necessary, because results depend on the milk and tools you use.
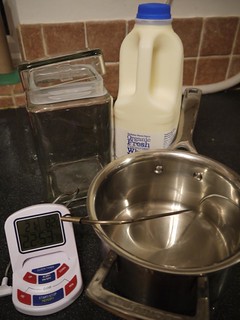
I use non-homogenised, organic milk. If you can find it locally, so much the better. If you can find it in a glass jar, possibly even better.
And I process it with the kit in the picture.
Besides, you need some yogurt as a starter (after the first time, you will reserve a few spoonfuls of the previous batch). I tried several and the one I liked most was Yeo Valley Greek Natural, because it does not contain any funny stuff (“No added ingredients. No added sugar.”) and because it contains
- Lactobacillus bulgaricus;
- Steptococcus thermophilus (the two yogurt bacteria); and
- Bifidobacteria (probiotics)


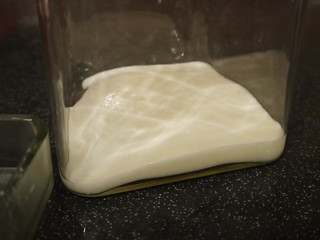

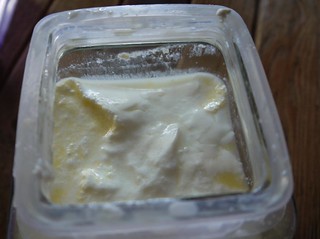
Place in the fridge for a few hours to cool down and settle before eating.
Oh by the way, if it does not work and you do not find it thick,the cause was the temperature not being warm enough for enough time. You can heat it up in the jar to around 50C by placing in the oven (mind any plastic that might melt), and let it cool down inside.
Seedy penpals
I must have written before that I have a collector streak in me, and it comes out with seeds.
Every winter I get all the packets out from the recesses of my shed and take stock: I usually end up with some 150-300 species on my database (they have grown over the years both with perennials – which I also catalouge – and new seeds). Then I sort them by month of sowing, put them in coffee tins and padded envelopes with some silica gel to keep them dry, and they go back to the shed, to be picked out at the right month…
… which sounds quite orderly, but it isn’t really, as I tend to run late after April every year (for some curious reason) so previous months’ tins lie about for a while, and then of course seeds can be sown over a range of months and I buy new ones on top (as I need them or it catches my fancy)… basically, by this time of the year I have lost track of what I have used and what I still have! That is why the winter stock taking is so necessary for me.
As my garden and allotments are getting to capacity, after four and five years of working on them respectively, last winter for the first time I realised I had simply too many seeds to use, so I started looking for someone interested to share, and I found it surprisingly difficult! It was only in spring that someone showed interest. I then mailed my seeds, which they might or might not have received. Never heard from them again. That I found sad, as I care for my seeds.
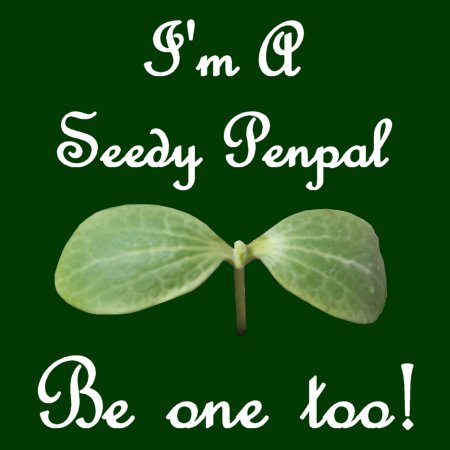
Then Carl came up with the idea of “seedy penpals“, like the penpals of yore, sending letters to each other, swapping surplus seeds, and keeping in touch on gardening progress. It is a great idea as you get to try new seeds, share your surplus and know what happens to it, and get to know someone at the same time: I enrolled straight away.
The first seeds swap ever under the scheme was scheduled for early August, and it has now gone through, so I have now virtually met Rebecca and Lucy, and we swapped seeds.
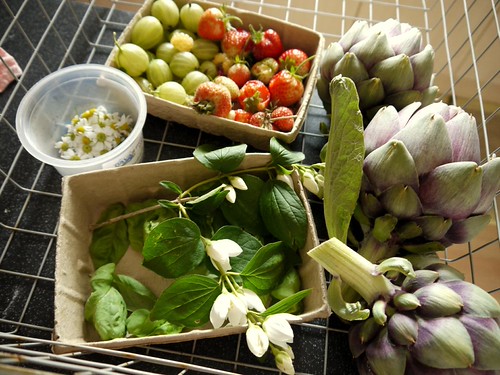
Rebecca is my receiver pal. We had a lovely exchange of emails and, based on her preferences, I selected some seeds to send her. Always a difficult task for a seed hoarder like me 😀 , but I enjoyed trying to match species to Rebecca’s asks and writing to her about them. I thought some seedlings would also fill up for the fact that we are at the end of the season and you cannot sow so many things now as you would in spring. I hope she enjoys my little parcel.
Today I also received my own parcel from Lucy. Collector’s paradise here, it will increase my collection rather than keep it in check! Lucy warned me she was quite busy at the moment, but despite that she managed to send me a rather wonderful parcel with a selection of flowers (for my new wildflower/cottage front garden, which I told her about) and veggies. The most interesting thing for me is she seems to have collected some of the seeds either from her own garden or other places, which I admire: I do not trust myself at saving seeds and have only occasionally attempted it- it’s something I’ve always wanted to take up, though, so here’s someone that I can learn from!

I’d better stop sitting in front of this screen, writing, and get going: a lot of sowing to be done!
Then, this winter, when I take stock of seeds again, I will have my seedy penpals in mind and the next swap in March to look forward too. 😀
Have you ever cooked artichokes?
After 4 years of toiling on the artichoke patch, this first week of summer yielded the first three edible ones: pride and joy!
I love artichokes, and it is quite difficult to find them here in the UK… a few years ago, when staying at Bangors Organic in Cornwall, Gill served them for dinner: whole, just steamed (or boiled?) with a butter serving – de-li-cio-us! So, before leaving, I was eager to ask for some to take away, I mean, we were ready to buy some! When we went back more recently, Neil recognised us as the people who asked for the artichokes – he said he was surprised by the request at the time! I like to think that that episode might have contributed to spark off the idea to open an organic farmers’ market at their place, The Big Green Shed, which they have inaugurated this month.
 Fast forward to now, here are my artichokes, just back from the plot: don’t they look appetizing?
If that was a new veg for me, I’d feel intimidated how to approach it… how do you pick, clean and eat? Any safety concerns?
I was like that with gooseberries when I first saw them… now I love them, thorns and all! I was not yet entirely comfortable with artichoke in the field, either: when are they ready to pick? Now I know: the leaves need to be starting to come apart.
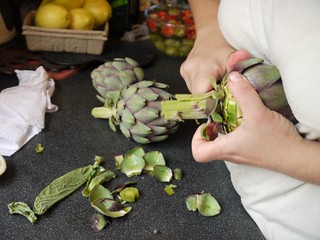
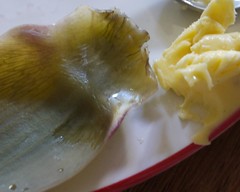
For those that have never cooked with artichokes, I have asked Gianfranco to take some pictures of me cleaning them: nobody should be put off such a lovely veg! They are fairly quick to deal with when you know how: it took me 48 mins from basket to plate, with taking pictures and all. Pictures from all steps are on Flickr, I copy here the essential ones to keep it shorter.
First thing to know, is that artichokes oxidise and go unappealingly brown as soon as cut, unless kept in acidic conditions, which in my family we do by washing and keeping in water in which lemon has been squeezed.
Second thing to know if you do not want to be put off from ever eating artichokes again is: the tasty bit is the heart, all the rest is basically a way for the plant to discourage pests eating it (humans as well) you have to be absolutely ruthless with what you take away – everything that feels like cutting into cardboard, anything spiny and the choke need to go.
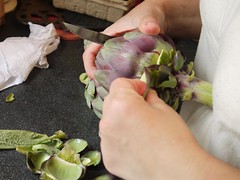 I start by pulling out the external leaves. The smallish ones are composted, while the bigger ones can be used later – take care to keep them whole at the base. As soon as they are off, put in lemon & water. Everything that is green at the base is off, you have to be left with yellow and red.
 If the stalk is not too woody, you can keep it on for cooked recipes, but have to peel it (up to the first leaves’ remains). It’s not too good in raw recipes, so you can keep it for later together with the leaves.
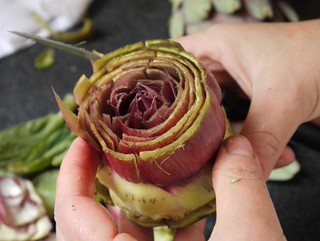
Take the top of the leaves off. I have left too many tougher leaves (see the greenness there?): always tempted to keep as much as possible – this is the time to take them off, really. Also, you have to decide how high up to cut depending on how tough those internal leaves are.
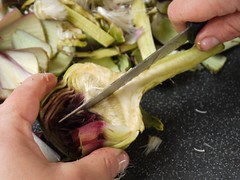
Half the heart and then quarter it.
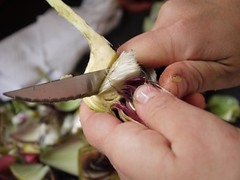
Remove the choke. There is a line where the blade goes in easily at the bottom of the fluffy choke. Do not cut into the flesh, that’s what you eat! Take away all the internal spiny leaves too: they look deceptively innocuous. Get them in the water & lemon asap to avoid discolouration.
Ready for eating!
I love them raw, sliced with salt, extravergin olive oil and lemon. Also delicious sliced and deep fried in a batter of egg, dusting of flour, lightly salted: OH granny’s Easter speciality.
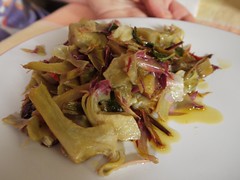
This time, I braised them in lemon juice after lightly frying with garlic & chilli. Stirred in a few fresh basil leaves, chopped. Et voila!
I kept the tough leaves in acidic water until next day & boiled until tender: the fleshy bit goes green and you can see veins. Holding the leaf at the top, you can dip them in butter and scoop out the flesh with your teeth (guilty pleasure, that’s how I ate them at Gill’s back then).
My aunty, more refinedly, scoops them out with a spoon to make puree.
How will you cook them?
About Me
 M.Paola, that’s me
I got my first allotment in the UK in 2007 and started growing my own food. Learning as I went along was not enough, so I studied horticulture. Faced with the horticultural warfare, I became a conscientious objector: I use no chemicals and support organic principles and regulations.
Brexit gave me a new life in the Netherlands, three new plots by a nature reserve and an MSc in sustainable food systems.
I write in my personal capacity and, as a language perfectionist and a non native speaker, I keep reviewing my entries’ text for clarity.
Some Rights Reserved

This work is licenced under a Creative Commons Licence.